GPS (Graduation Planning & Support) is a new degree audit and planning tool designed to help you navigate your academic journey at MIT.
Understanding Your GPS Profile
Navigating your Progress tab.
Interpreting Your Degree Audit
Track your progress on completed and remaining requirements.
Using the Planner
Visually create one or more academic plans for future terms.
Understanding Your GPS Profile
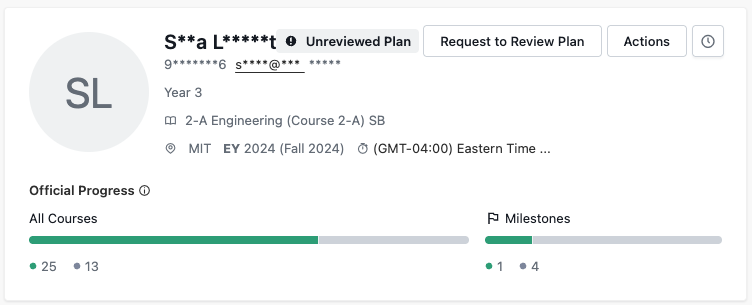
You can find your GPS profile information in the “Track Progress” tab. Your profile contains information about you, your current term, and your progress towards degree requirements.
Progress bars:
You’ll notice two progress bars towards the top of your profile; one for subjects, and one for milestones. Each shows a snapshot view of your progress towards your degree requirements. The subjects progress bar shows the number of subjects you have completed and remaining.
- Taken will include any subject with a passing grade entered into the system that is counting toward your academic progress
- Planned includes subjects planned within GPS and subjects you are officially registered for.
- Remaining indicates the number of requirements that are listed in your program requirements but that you have not yet been taken or registered
- Unmatched includes subjects that are not counting toward any requirement in your plan. You’ll be able to see a full list of unmatched subjects at the very bottom of your degree audit.
The milestone progress bar shows the numbers of milestones you have completed and remaining. The four milestones built into your degree audit are:
- Swim Requirement
- PE Points
- HASS Concentration Proposal
- HASS Concentration Completion
Advisors:
GPS shows the name and email address for any assigned advisors connected to your student record. If you’d like to share your audit and plan with an advisor that is not officially assigned to you, you may do so by following these steps:
- Click your initials in the top right corner of your GPS screen and select Settings.

- In User Settings, click Add an Advisor
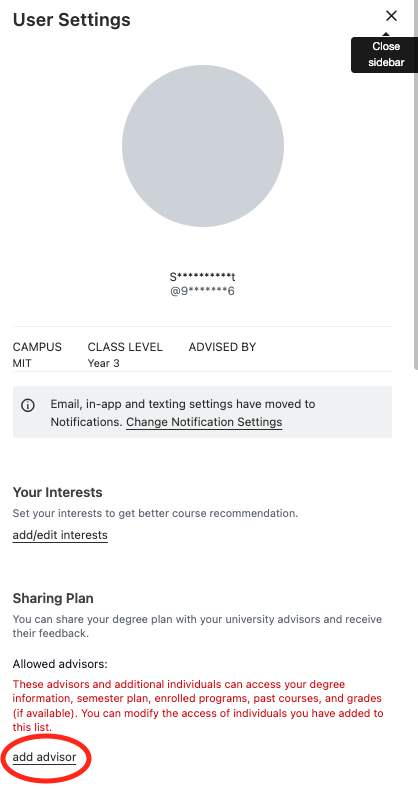
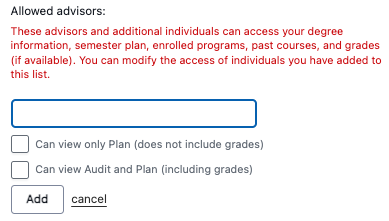
- Search for the name of the individual you want to add. You can choose to give this individual access to view your plan (not including grades) or to view your audit and plan (including grades). Then click Add.
Current Term
The current term section shows the classes you are registered for for the current term. Registration information is pulled into GPS from WebSIS, and may take about 24 hours to update. Find more information about how to register here.
Scroll down in your profile to view the following tabs:
- Progress: Your degree audit.
- Plans: Your plan for future terms.
- Courses: Your class history and grades
- Notes: Any advising notes that your advisor has shared with you
Interpreting Your Degree Audit
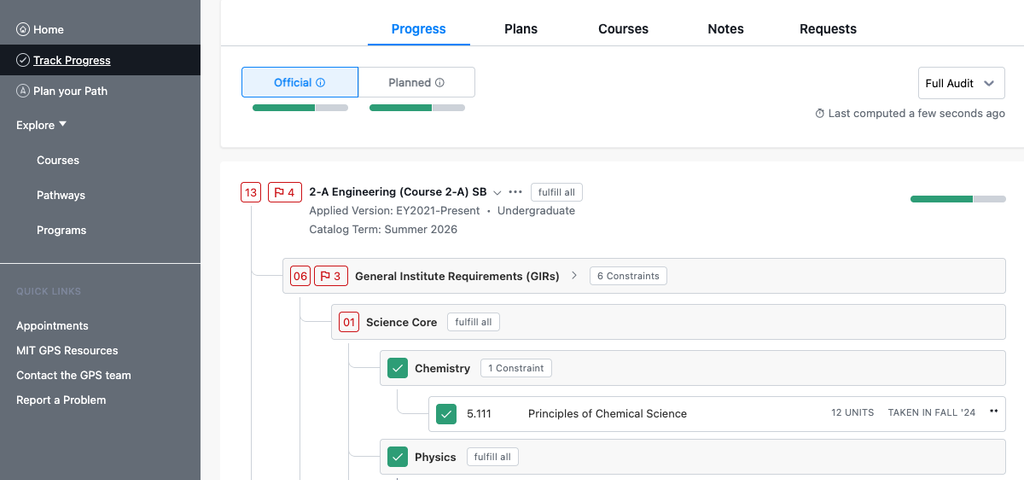
The GPS Degree Audit shows your completed and remaining requirements, including General Institute Requirements and Major Requirements. Navigate to your audit by clicking the Track Progress tab on the left side of your screen and scrolling down to the Progress tab of your profile.
Structure of the Degree Audit
Audits in GPS populate with your declared major and minor program(s) in addition to the GIRs. If you have not declared a major yet, your audit will display only the GIRs for now.
If you have multiple programs (a major and a minor, two majors, etc.), both programs will populate in your audit. The GIRs and Units Beyond the GIRs will populate within your primary major.
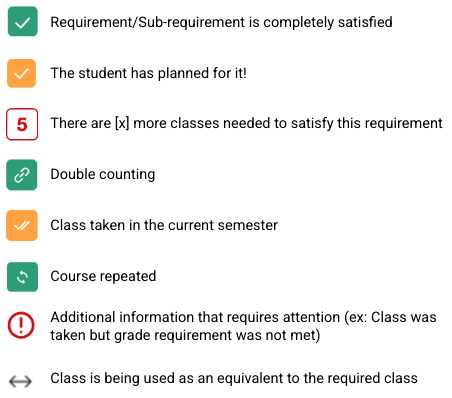
Click the arrows next to any requirement to view the details of that section. Generally, green means that a requirement is complete, and red means that a requirement is remaining. Consult the icon glossary at the bottom of this page for additional details.
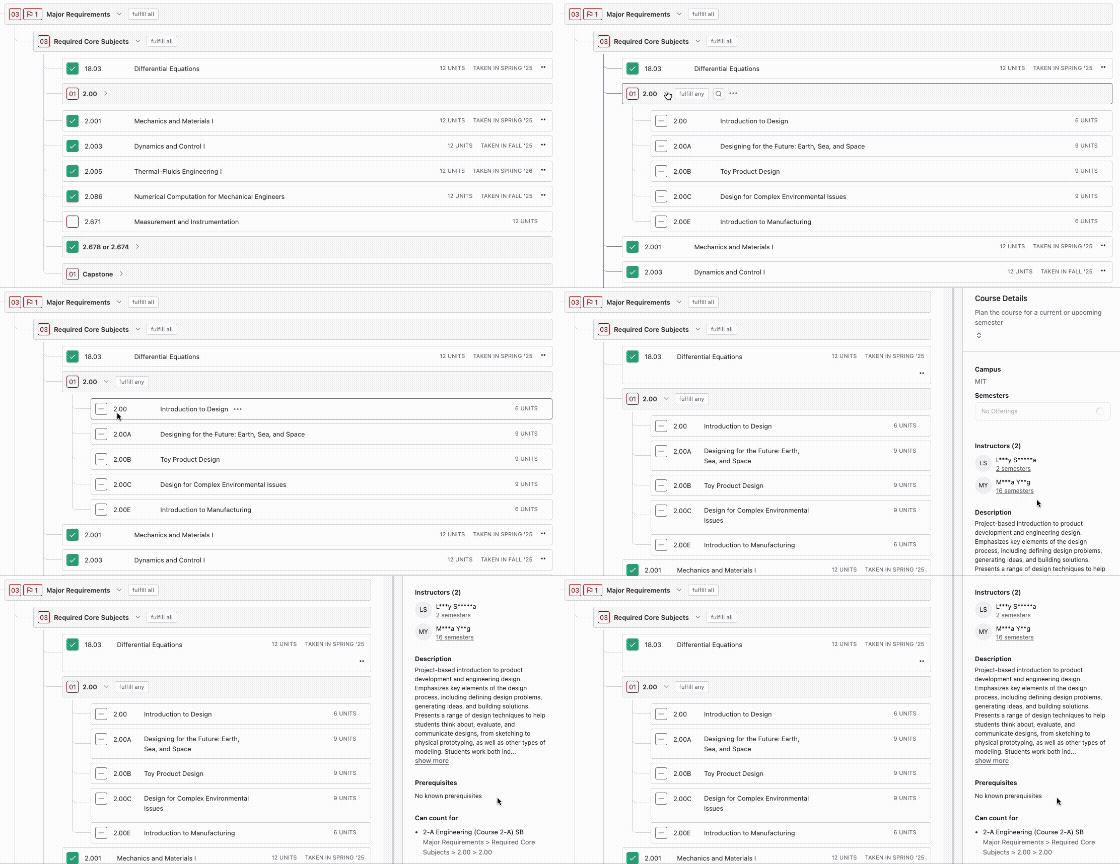
Official vs. Planned Audits
The official version of the audit shows the classes that you have completed. The planned version of the audit includes completed classes and classes included in your academic plan. The planned version of the audit is helpful if you have questions about how your upcoming classes will impact your degree progress.

Unmatched classes
Unmatched classes are those that do not count towards anything in the audit, including the unit total. Classes can be unmatched because the letter grade is not sufficient to fulfill the requirement or because another class is filling the requirement instead.
Icon Glossary
Need support?
- For general questions and help interpreting your audit, connect with your UAC Advisor.
- For specific questions about major requirements or exceptions, connect with your departmental advisor.
- For technical questions, contact gps-questions@mit.edu.
Using the Planner
The Planner feature in GPS allows you to create one or more academic plans by adding classes and requirements to future terms. It’s important to note that creating a plan does not replace the official registration process. You are encouraged to use the GPS planner to develop a long term strategy to complete your requirements, but you still must complete the official registration process through WebSIS each term.
Editing Plans
Navigate to your plan by clicking the Plan Your Path tab on the left side of your GPS home screen. From the Plan your Path page, the screen is split into two sections: your planned semesters on the left, and tabs for Remaining (unplanned requirements), Progress (degree audit), and Search Courses on the right.
To add classes to your plan, you can either:
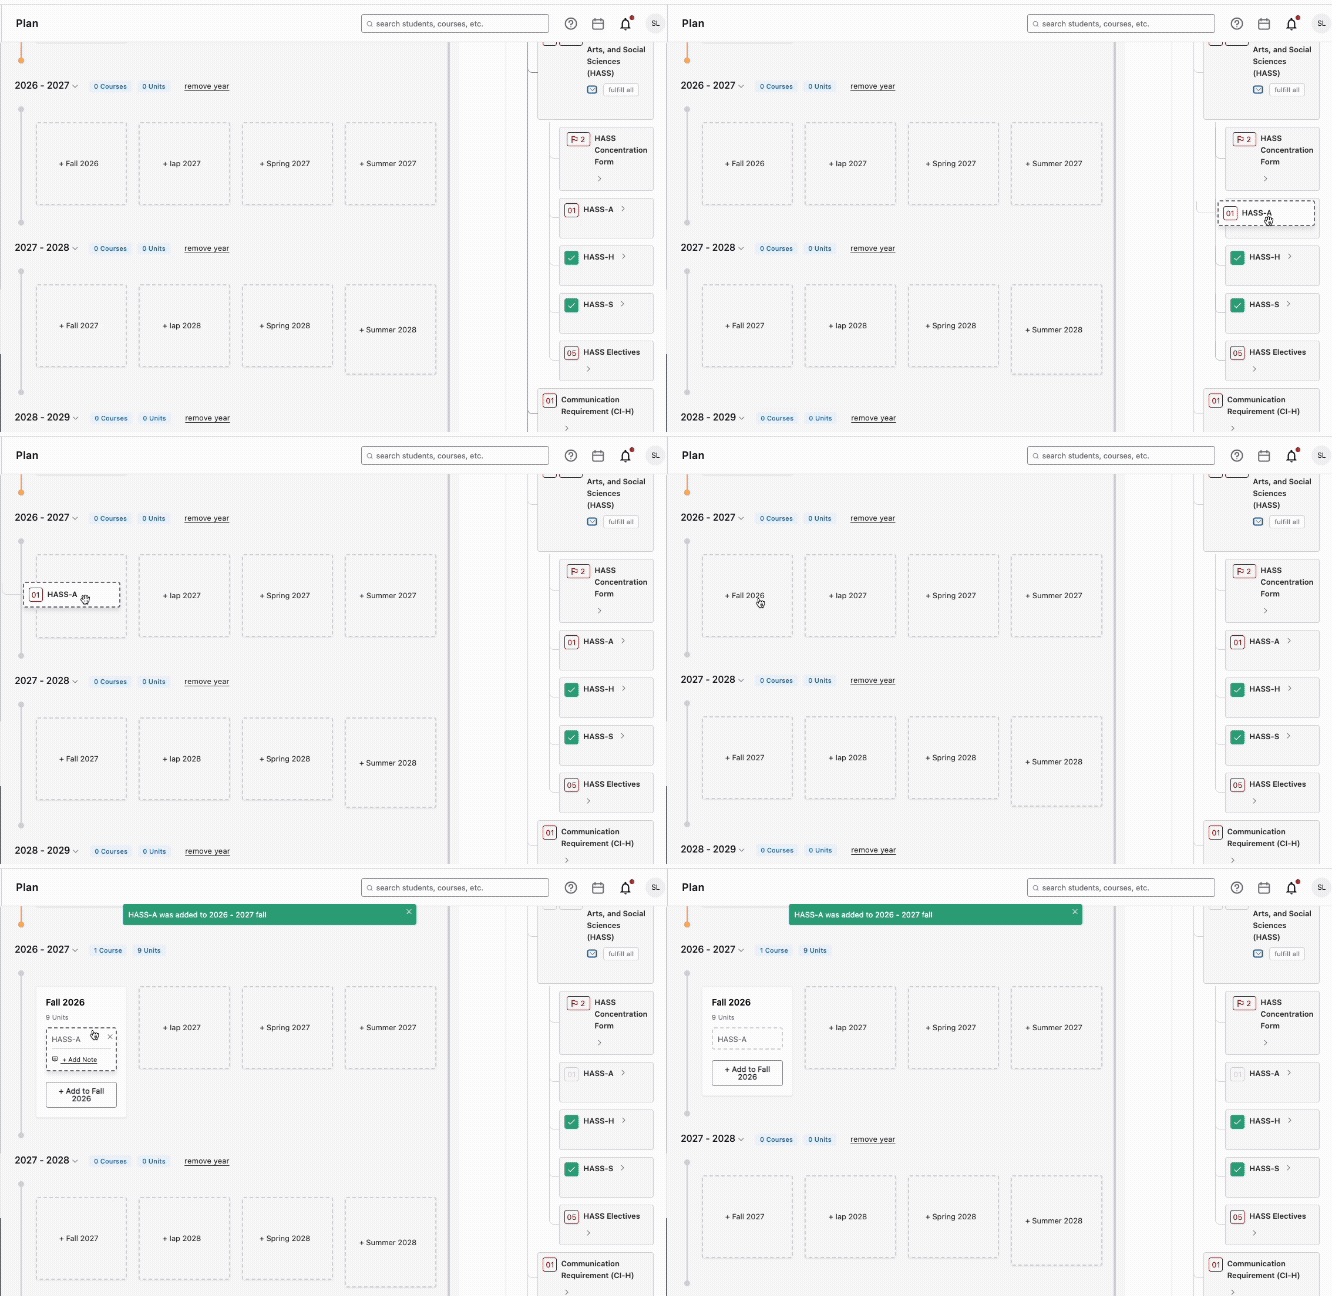
- Drag and drop a specific class or requirement from the right side of the screen into the semester you are planning on the left side of the screen
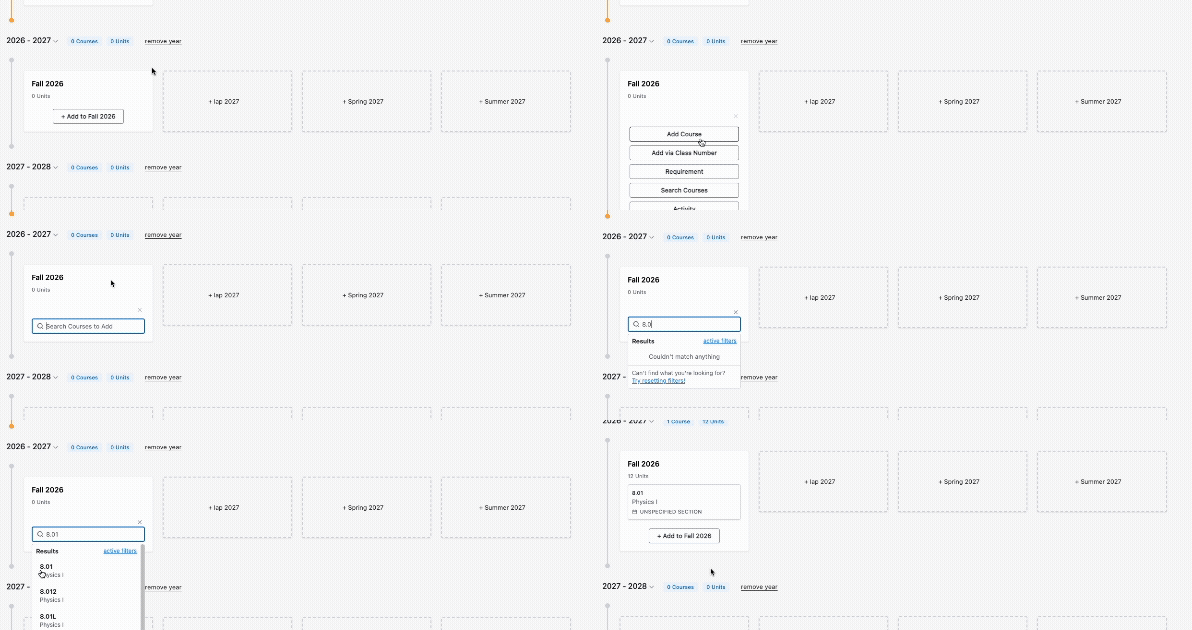
- By clicking Add to [Term] and searching for a class or requirement
If you attempt to add a class to your plan that is not offered in the term you are planning it in, you will see an alert notifying you that the class is not offered in that term.

Creating New Plans
You can create up to 5 plans in GPS. Your primary plan is the plan that includes your currently declared program(s). Additional plans can be made to explore what-if scenarios, including adding a minor, adding a major, or simply rearranging your remaining requirements.
To create a new plan:
- Navigate to your plan by clicking the Plan Your Path tab on the left side of your screen
- Click the arrow next to your name
- Click +Add new plan
- Choose a new plan option
- Give the new plan a name and choose whether you want this plan to be private or shared
- Click Add program and search for the program you want to add.
- The new program will now appear in the Progress tab on the right side of the screen, where you can find the associated requirements and add them to the plan.
Sharing Your Plan
Your assigned advisor(s) have access to view any plans you create unless you choose to make them private. We encourage you to review your plan with your UAC and departmental advisors to ensure that you are on track to meet your requirements.
Back to menu