GPS provides MIT faculty and professional advisors with an online dashboard to support student success and allow advisors to focus on holistic student development.
How to Log Notes in GPS
Guidance on taking high-quality notes in GPS. Includes Best Practices Guide.
Understanding the Degree Audit
Help students track progress on completed and remaining requirements.
View & Edit Plans
Review academic plans with students.
Appointment Scheduling
Schedule and manage student appointments through GPS.
Create Lists & Reports
Use filters to track a set of students.
How to Log Advising Notes in GPS
By maintaining high-quality notes in GPS, we create a shared history that:
- Reduces “Story Fatigue”: Students don’t have to repeat their story to every new advisor or dean.
- Provides Context: Helps advisors understand a student’s trajectory across different DLCIs (Departments, Labs, Centers and Institutes).
- Ensures Continuity: Acts as a “memory supplement” for advisors managing large cohorts.
Advising notes are part of a student’s educational record under FERPA, which means that students have the right to request access to to their advising notes. Consult this Note-Taking Guide to learn more about what type of information can and cannot be shared in GPS notes.
Accessing Notes
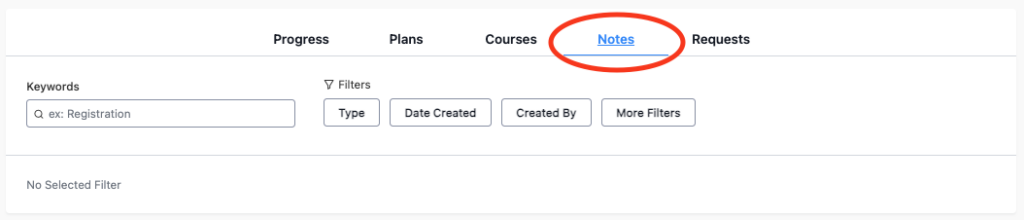
To access student notes, navigate to any student profile and scroll down to the Notes tab.
Note Types
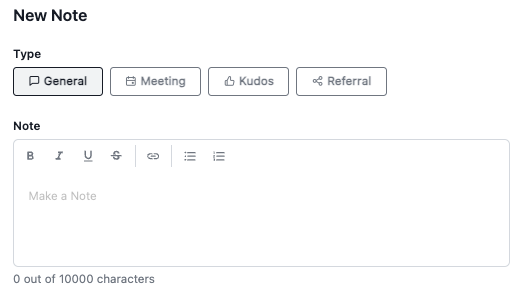
When entering a note from scratch in GPS, you’ll see several note type options:
- General notes are used to record interactions with students.
- Meeting notes are the same as general notes, but include fields for you to indicate time and location of your meeting.
- Kudos are used to recognize and document positive student achievements, progress, or milestones.
- Referrals are used to connect students with campus resources and track those connections.
General and Meeting Notes
General and meeting notes are used to document interactions with students. Meeting notes include additional fields for time and location, but function the same as general notes. Use these note types to summarize key topics discussed, document factual, relevant information about the student’s progress, and note outcomes, decisions, and next steps. General and meeting notes should be your primary note type for most advising interactions.
Kudos
Kudos are used to recognize and document positive student achievements, progress, or milestones. Use Kudos to highlight academic or personal accomplishments or to acknowledge progress towards goals or improved performance. Note that Kudos notes are automatically visible to the student and all staff with access to the student’s profile.
Referrals
Use referrals to direct students to specific staff or offices and track whether the student makes that connection. Referrals help ensure that students are connected to the right support and allow others to see what outreach has already occurred.
When logging a referral, you will be asked to enter a specific user or group to refer to, or can select a “relationship with student” (i.e., student’s UAC advisor, departmental staff, etc.).
When a referral is saved, the person receiving the referral will receive a notification in their GPS home page alerting them to the referral. They can then choose to reassign the referral to another person or group, or change the status of the referral to “resolved” or “unresolved”.
In the initial phases of MIT’s GPS implementation, only certain units will be available for referrals. Check with your unit if you have questions about referral practices for a specific group.
Referrals should not be used to connect students with S3, GradSupport, or the CARE team. Continue following your department’s existing processes for raising concerns with campus support resources.
If you have a concern about a student and you are not sure where to start, follow the steps below. Click here for more information.
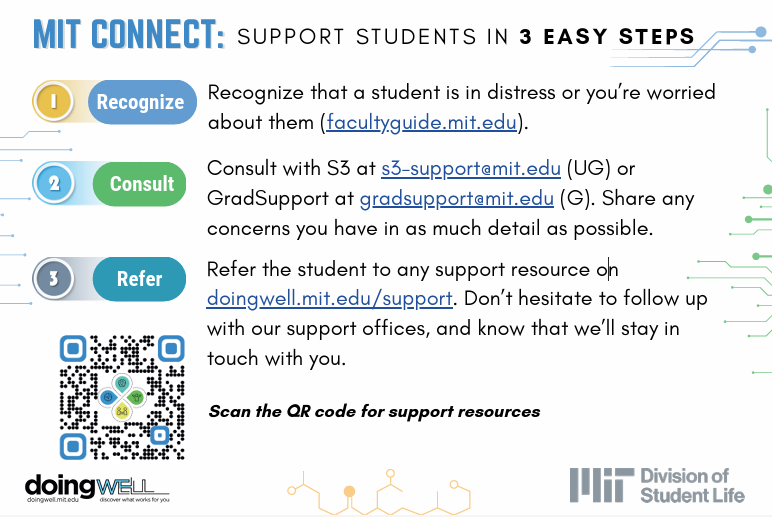
Emergency Contacts:
If a student is in immediate danger or a life-threatening crisis, do not wait to write a note.
MIT Police:
617-253-1212 (or dial 100 from a campus phone)
Dean on Call:
Accessible via MIT Police after hours for student emergencies
Managing Note Visibility
Users can control visibility settings of notes in GPS. Use these settings strategically to balance collaboration with student privacy.
Default Access Levels at MIT
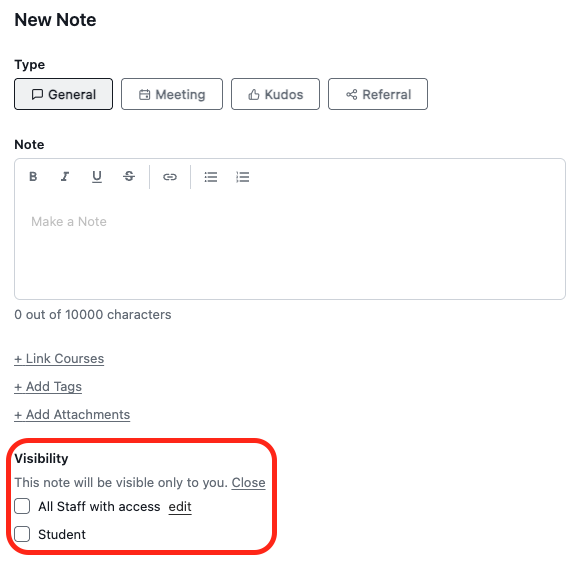
- Students: Students do not see notes unless the “Visible to Student” box is checked.
- Departmental Advisors: Can see notes for students in their advising caseload.
- Departmental Staff: Can see notes for all students in their academic department, and students with minors in their department.
- UAC Advisors: Can see notes for all undergraduate students.
- S3 & GradSupport: Often have broader access to ensure student safety and policy compliance. Can see notes for all students.
Important Note: Access to general advising notes does not include access to all notes in GPS. Notes entered by S3 and GradSupport are more restricted and are only visible to those units and the CARE team. These notes are not viewable by advisors, departmental staff, or others who may have access to a student’s record.
Making Notes Private
Visibility settings can be changed to limit or grant note access to an individual or group that would or would not be able to see the note by default. You can also limit note visibility to only you by unchecking the “All staff with access” box. Use this setting whenever you are logging a note that you do not want other staff or the student to see. More guidance on private notes can be found here.
Making Notes Visible to Students
GPS allows advisors and staff to make notes visible to the student associated with the record. Whether notes are made visible to students can vary based on advising practices, departmental norms, and the specifics of a given situation. If you set a note’s visibility to include the student, they are notified within their GPS portal. If you add student visibility later by editing your note, the student will not be notified unless you tag them with @.
Additional Note Features
GPS offers a few additional note features that can help keep notes organized, searchable, and collaborative.
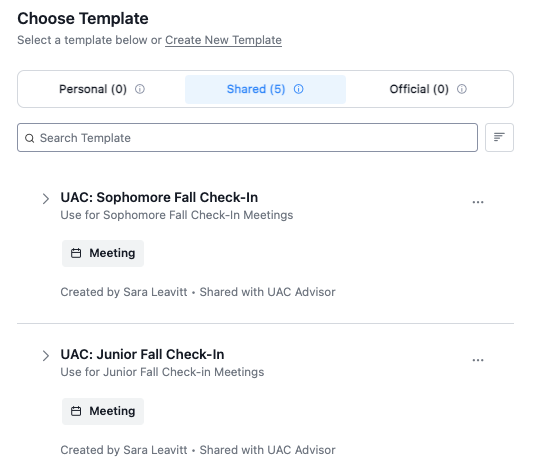
Using Note Templates: Templates help you create structured, consistent notes without starting from scratch each time. You can choose to use a shared template or to build your own. Templates can include title, description, body text, tags, and default visibility settings. Templates can help you:
- Save time on repeat interactions (Example: Create a template for your first-year advising sessions with common questions to prompt you when writing your note after each meeting)
- Keep notes consistent across a team (Example: Shared advising templates ensure all advisors within your unit document key details in the same way)
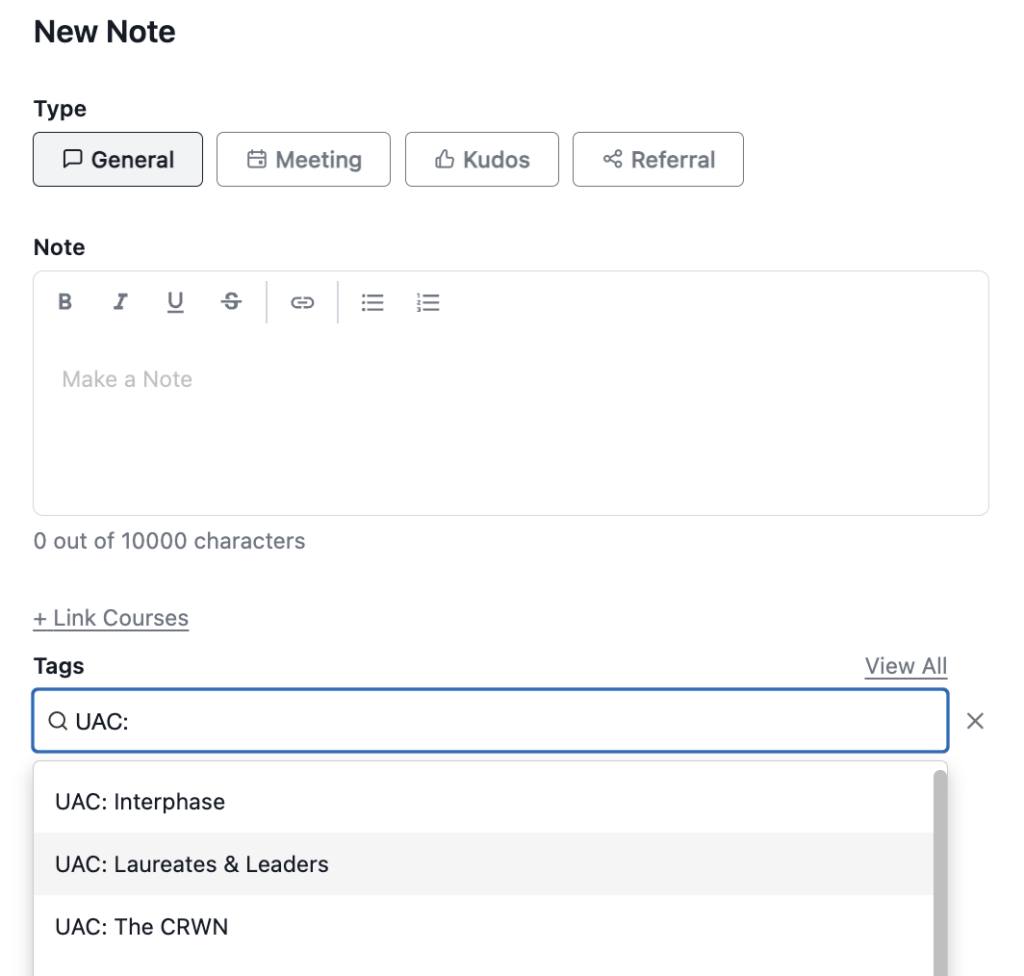
Using Note Tags: Use note tags to categorize your notes. Note tags make it easier to stay organized and quickly find specific types of student interactions later. Each unit may use note tags differently, so check in with your unit administrators to determine the best way to use note tags in your area. Not all users have permission to create new note tags. If you’d like a note tag created, please email gps-questions@mit.edu.
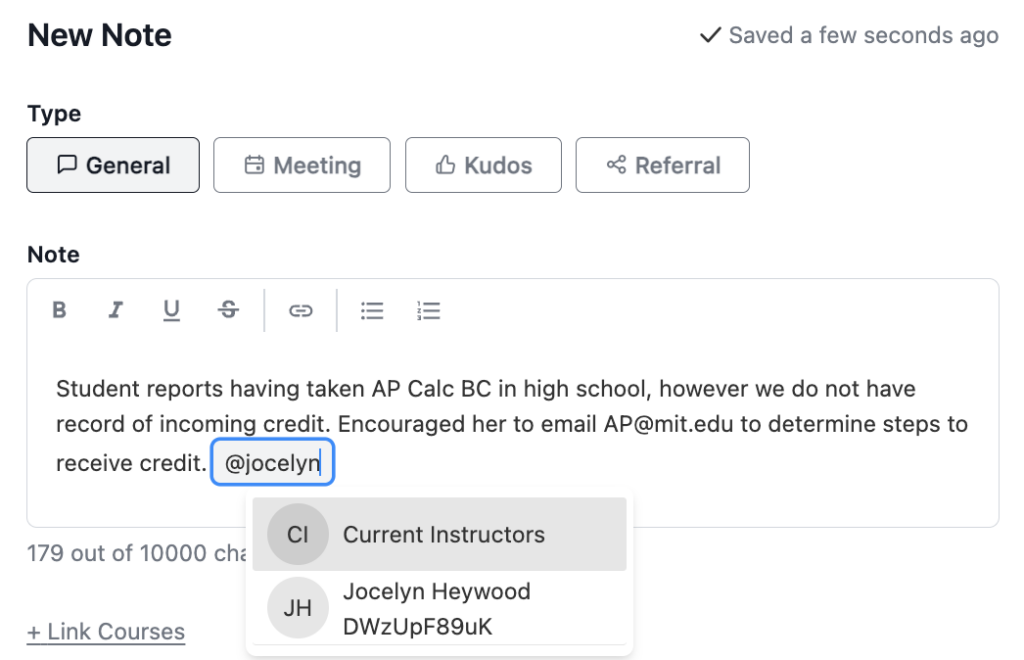
Tagging a Colleague: Use @ to tag another advisor or staff member in your note. The person tagged will receive a notification alerting them about your tag. Use this when you want to loop someone in, flag a follow-up, or make sure the right person sees important information.
Linking Classes: Link a subject to your note when documenting conversations about a specific class (e.g., academic difficulty, course planning, etc).
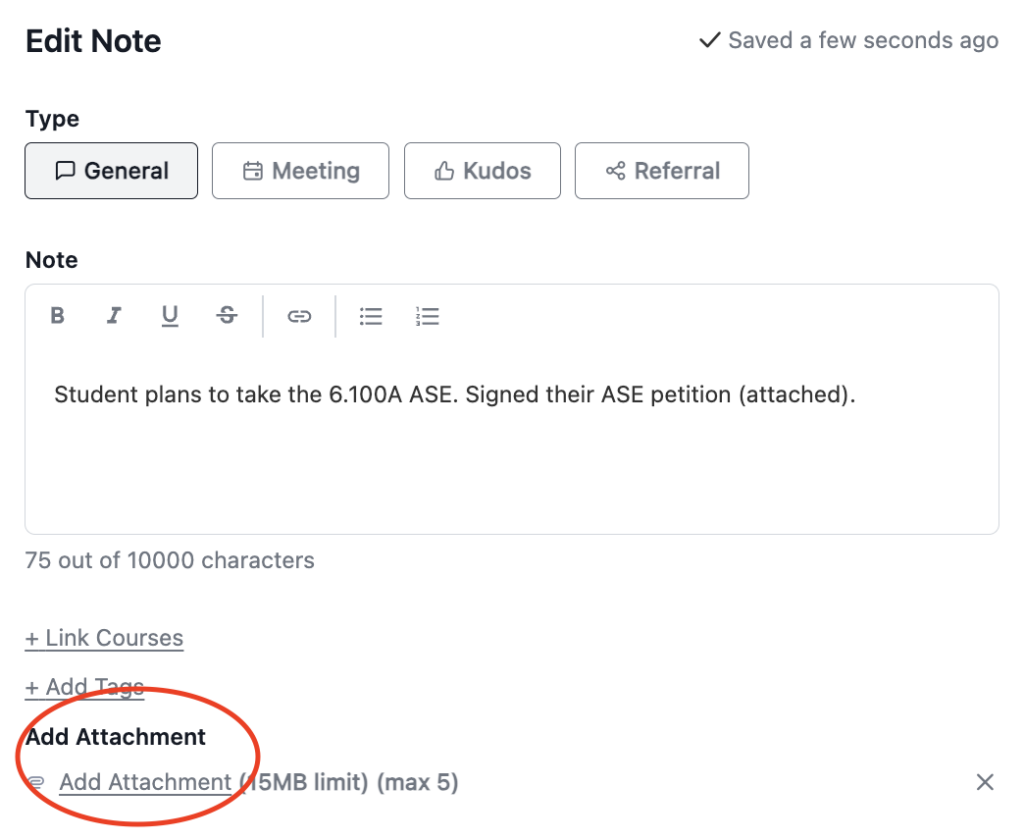
Adding Attachments: Add up to 5 files per note. Use the attachments feature to save forms or paperwork related to a student conversation all in one place.
Handling Sensitive Information
GPS is a tool for academic progress and general advising; it is not a repository for medical records or crisis management details.
If a student is in distress, your priority is connecting the student with the appropriate resource, not recording the note.
Note Taking Best Practices Guide
Understanding Degree Audits in GPS
The GPS Degree Audit shows a student’s completed and remaining requirements, including General Institute Requirements and Major Requirements. Use the degree audit during advising appointments to help students track their progress and plan ahead.
Locating Degree Audits
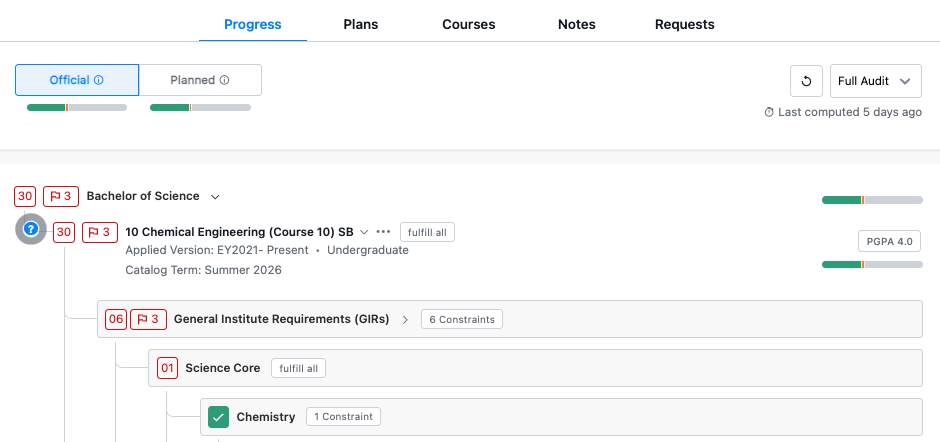
To locate a student’s degree audit, navigate to the student profile using the search bar at the top of your GPS home screen. Once you’ve opened a student profile, scroll down to the Progress tab:
Structure of the Degree Audit
Audits in GPS populate with the student’s declared major and minor program(s) in addition to the GIRs. If a student has not declared a major yet, their audit will only display the GIRs.
If a student has multiple programs (a major and a minor, two majors, etc.), both programs will populate in the audit. The GIRs and Units Beyond the GIRs will populate within the primary major.
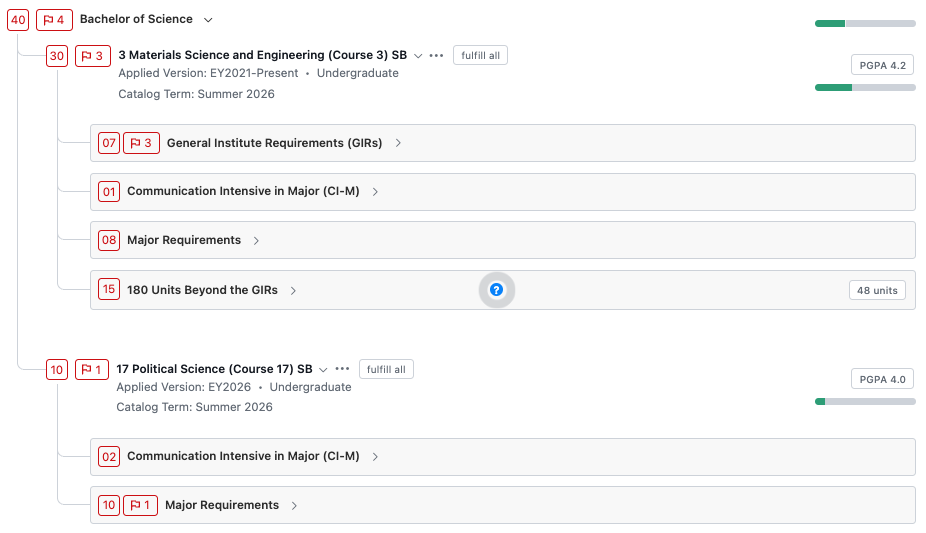
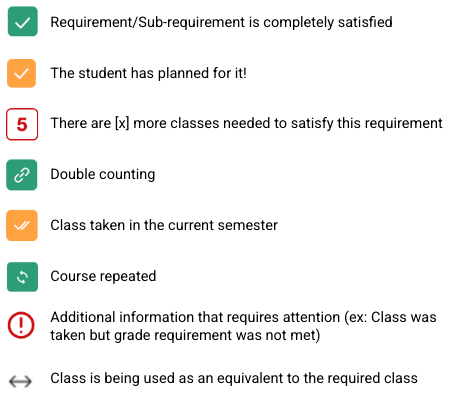
Click the arrows next to any requirement to view the details of that section. Generally, green means that a requirement is complete, and red means that a requirement is remaining. Consult the icon glossary at the bottom of this page for additional details.

Official vs. Planned Audits
The official version of the audit shows the classes that students have completed. The planned version of the audit includes completed classes and classes included in the student’s academic plan. The planned version of the audit is helpful when students have questions about how their upcoming classes will impact their degree progress.

Unmatched classes
Unmatched classes are those that do not count towards anything in the audit, including the unit total. Classes can be unmatched because the letter grade is not sufficient to fulfill the requirement or because another class is filling the requirement instead.
Icon Glossary
Viewing & Editing Plans
The Planner feature in GPS allows students to create one or more academic plans by adding classes and requirements to future terms. It’s important to note that creating a plan does not replace the official registration process. Students are encouraged to use the GPS planner to develop a long term strategy to complete their requirements, but are still mandated to register via WebSIS each term.
Depending on your role, you may have view access, edit access, or review access to student plans. Consult with your department or unit if you have questions about your specific permissions.
Viewing Plans
- Navigate to the student profile using the search bar at the top of your GPS home screen
- Scroll down to the Plans tab
- Click Edit in planner to see the degree audit alongside the student’s plan
- If a student has created multiple plans, you will see a dropdown menu with the plans available to view.

Editing Plans
Keep in mind that any changes you make to a student’s plan can be seen by the student.
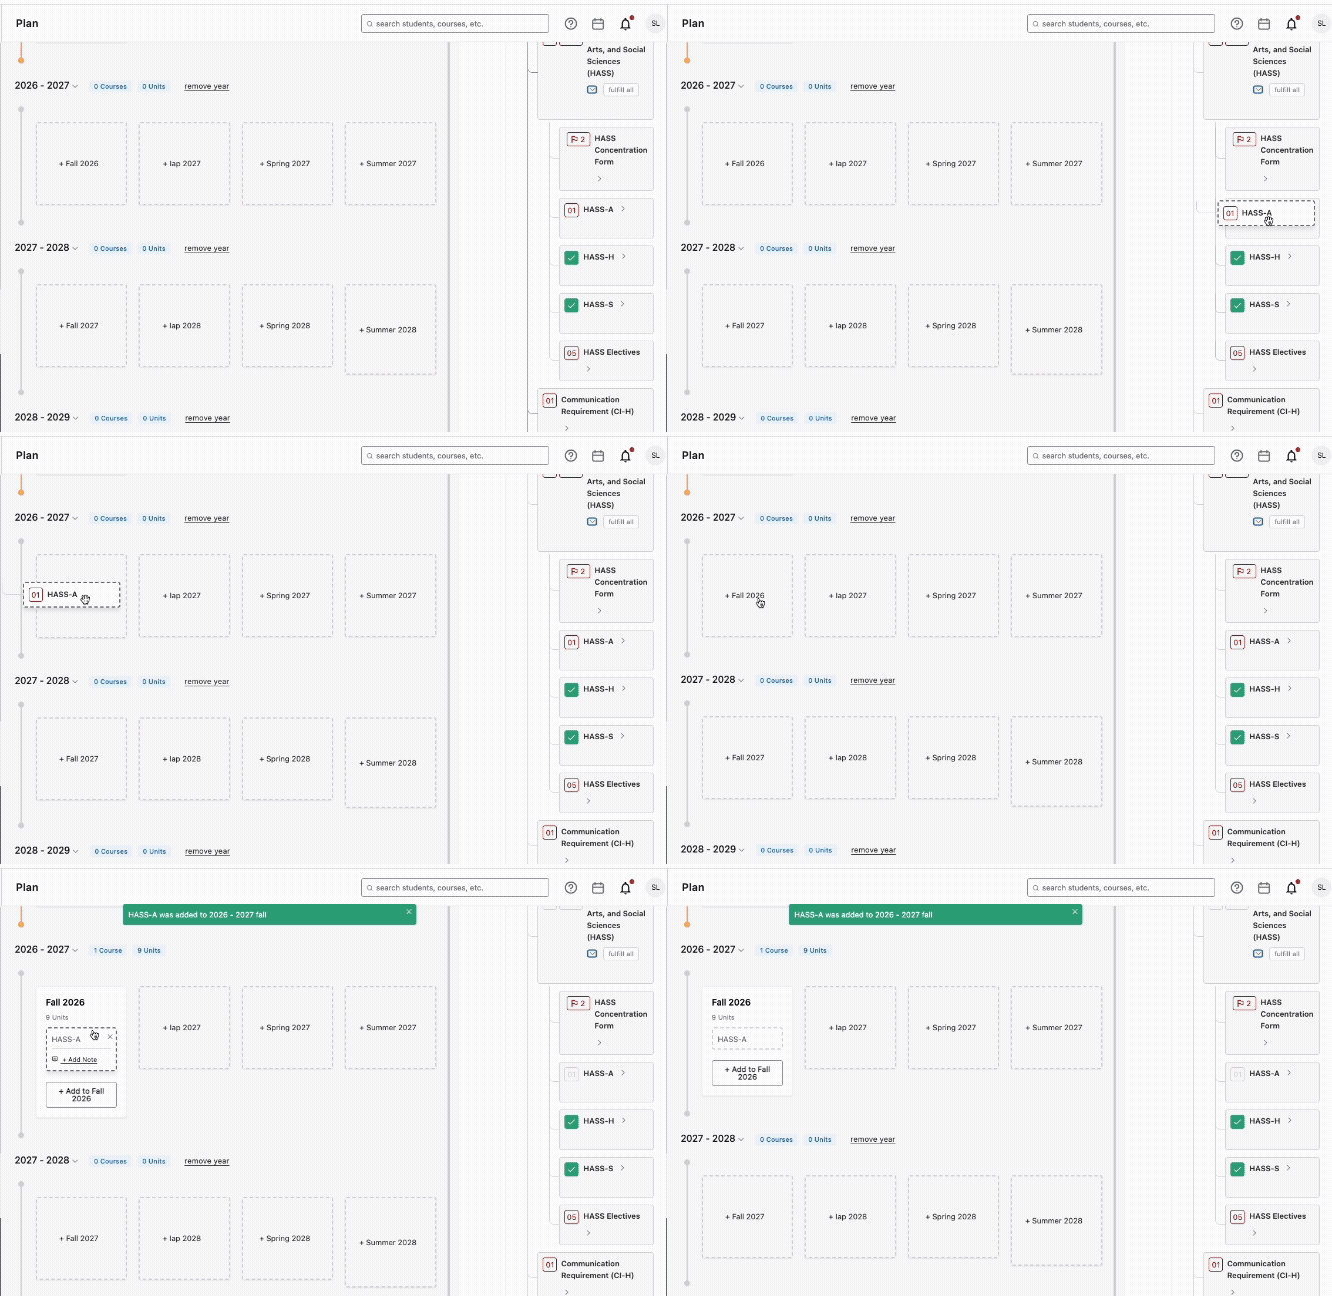
Edit a student’s plan by dragging and dropping a specific class or requirement from the side bar into the semester you are planning.
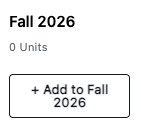
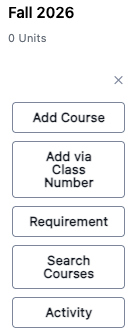
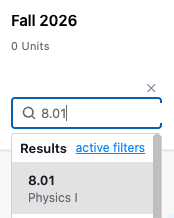
You can also edit a student’s plan by clicking Add to [Term] and searching for a class or requirement.
Creating New Plans
Students can have up to 5 plans in GPS. The student’s primary plan is the plan that includes only their declared program(s). Additional plans can be made to explore what-if scenarios, including adding a minor, adding a major, or simply rearranging their remaining requirements.
To create a new plan:
- Navigate to the Plans tab of the student profile
- Click Edit in planner
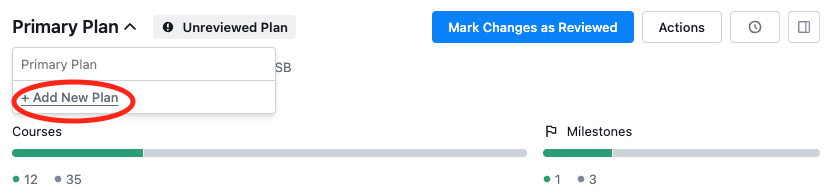
- Click the arrow next to the student’s name
- Click +Add new plan
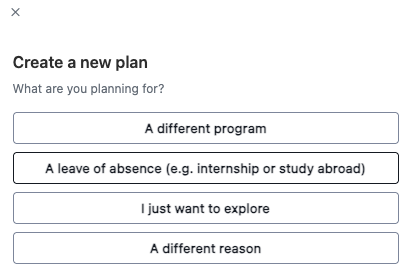
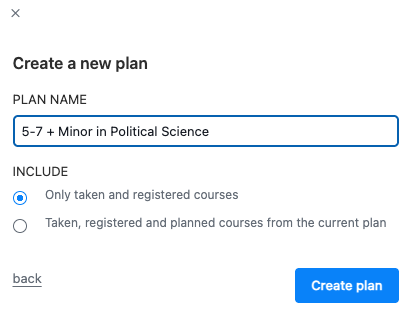
- Choose a new plan option and give the new plan a name
- Click Add program and search for the program you want to add.
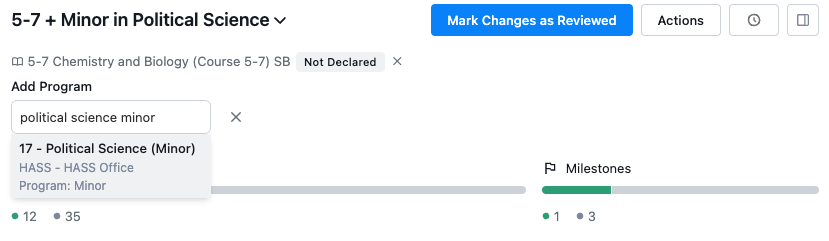
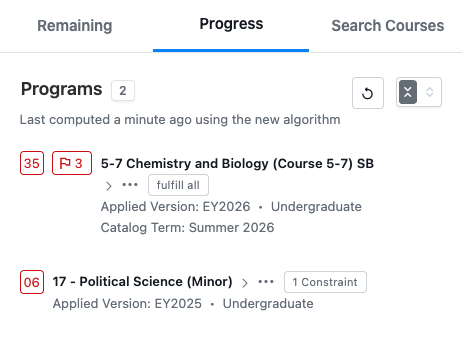
- The new program will now appear in the Progress tab on the right side of the screen, where you can find the associated requirements and add them to the plan.
Using GPS to Schedule Appointments
You can use GPS to schedule and manage student appointments, much like Calendly. In order to allow students to schedule appointments with you through GPS, you first need to indicate your availability by creating a time block.
Create a new time block
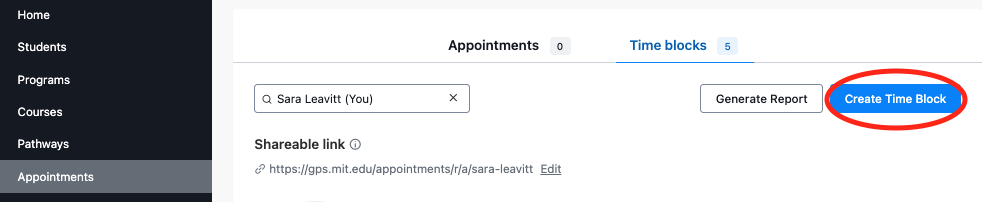
- Click into the Appointments section of GPS (found in the left hand menu)
- Click the Time blocks tab towards the top of the page
- Click Create Time block
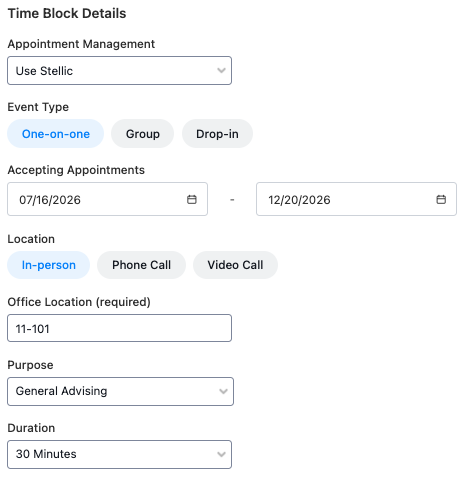
- Configure the details of your time block. You can customize your availability, the location of your meeting, the duration of your meeting, and more.
- Activate your time block by clicking the blue “Activate” button at the top of your screen.
Duplicate your time block
- If you plan to create multiple time blocks, click the three dots in the top right corner of your screen and select “create copy”. This will generate a duplicate of the time block you just created. Adjust the details of the copy to speed up the process of creating your next time block.

Finding your personal availability links
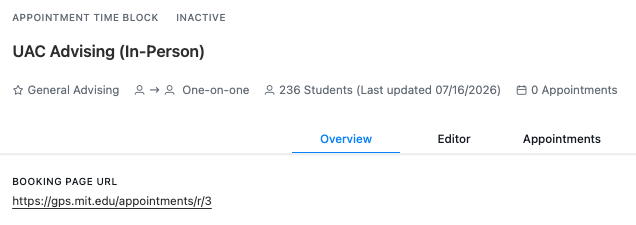
- To link to your GPS availability, copy the “ Shareable link” found at the top of your time blocks page. When students click this link, they will have the option to choose between any time blocks that they are eligible for.

- To link to a specific time block, click into the time block, scroll to the bottom, and copy the “Booking Page URL”. When students click this link, they will be brought directly to the availability of the time block you have linked.
Syncing Your Calendar
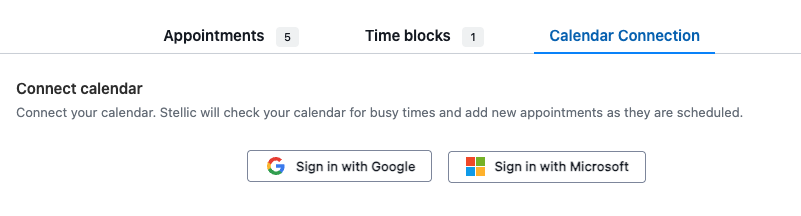
If you’d like to sync your Google or Outlook calendar to GPS, you can do so by clicking into the Calendar Connection tab and then signing in with your Google or Microsoft credentials. Once your calendar is synced, GPS will:
- Disallow students from scheduling during times when your Google/Outlook calendar is marked as busy.
- Automatically transfer appointments scheduled through GPS to your Google/Outlook calendar.
Managing Appointments
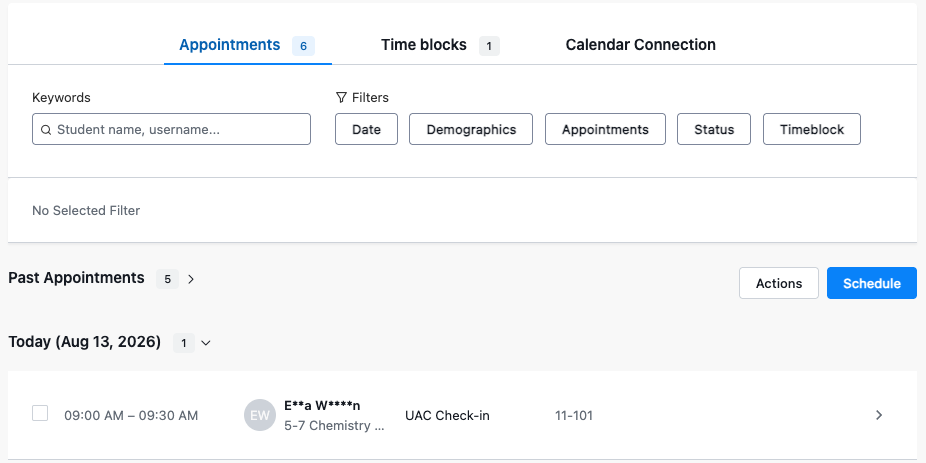
- When appointments are scheduled, you will be able to view them from your Home page or the Appointments tab of GPS.
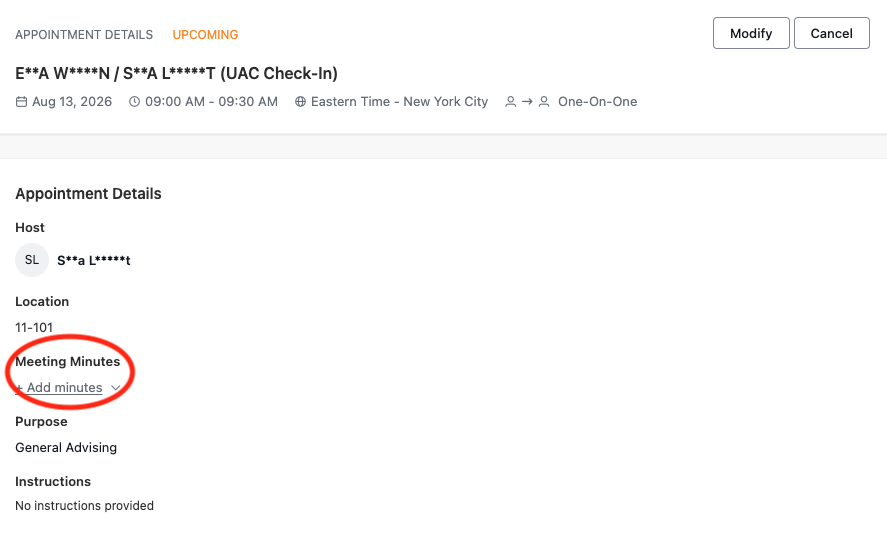
- Click into the appointment to view the details of the appointment, cancel, or reschedule. Click “add meeting minutes” to record notes associated with the appointment.
Creating Lists & Reports
Use the filters in the Students tab of GPS to create and save student lists. Saved lists are helpful if you want to view or keep track of the same set of students over a period of time.
To create and save a list:
- Navigate to the Students tab of GPS
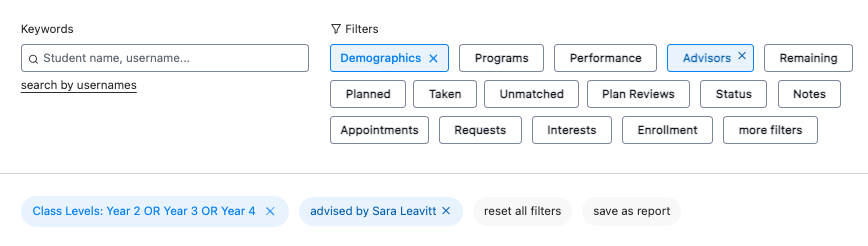
- Use the filters section to find the students you are searching for
- You can filter for things like demographics (class year, entry term, department, tags), programs, GPA and grades, whether students have scheduled appointments, students with a specific advisor, and much more.
- Click save as report
In the example below, filters are being used to search for students in year 2, 3, or 4, who are advised by Sara Leavitt.
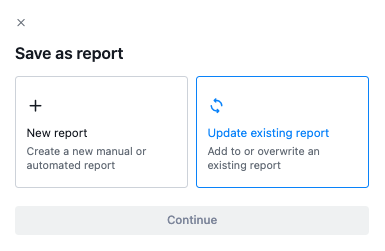
- Choose whether you’d like to save as a new report or update an existing report
- If saving a new report, give your report a name and select whether you want it to be an automated report (students will automatically be added when they match the criteria you’ve selected), or manual (the list will remain the same until you manually add more students).
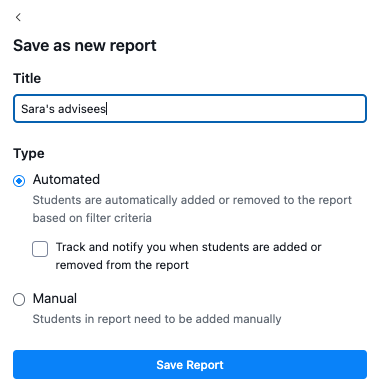
- To pin the report to your home page, click the three dots in the top right corner of the report and choose Pin report.
Creating Manual Reports
If you want to track a list of students that you can’t filter for in GPS, you can do so by creating a manual report.
To create a manual report:
- Navigate to the Students tab in GPS
- Click +Add New Manual Report
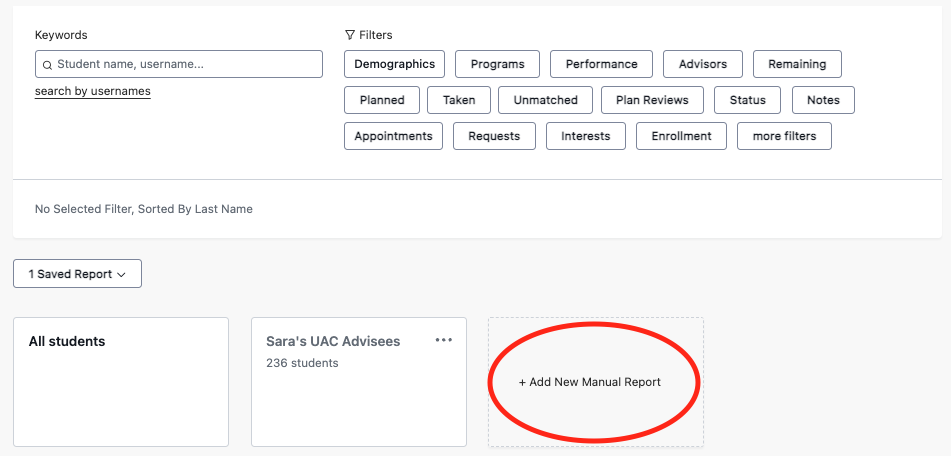
- Give your report a name and click Save Report
- Click into the report and then click +Add Student
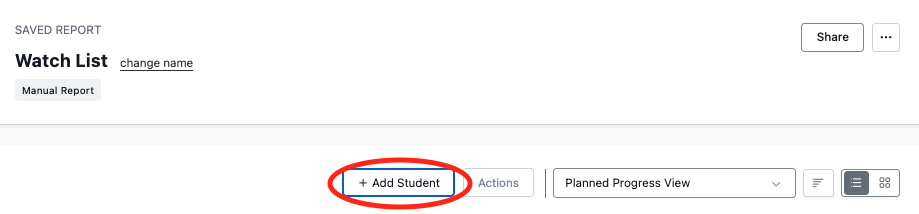
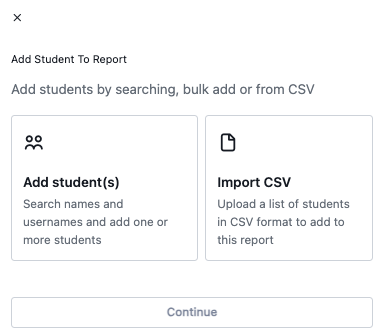
- Click Add students
As of now, students can only be added to reports by searching for names/usernames. The ability to import a CSV of student names is coming soon!
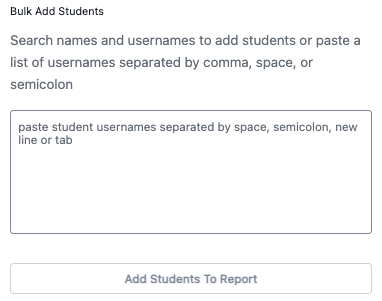
- Enter (or copy and paste) student usernames into the student field and then click Add Students to Report
Generating Reports from Student Lists
To export information about a list of students:
- Click into your saved report
- Click the checkmark next to the total number of students to select all, or select whichever students you want to include in your report
- Click Actions
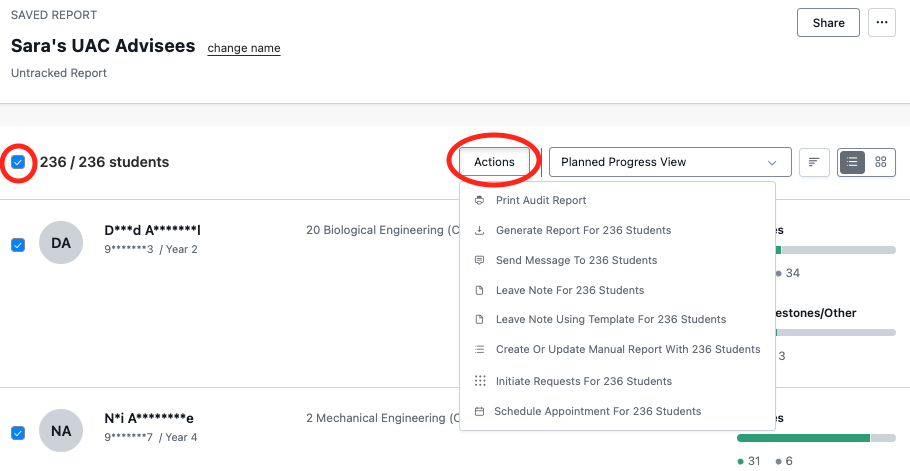
- Click Generate Report for [#] Students
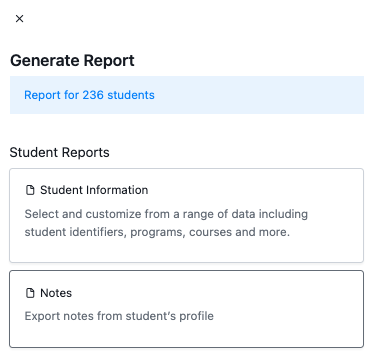
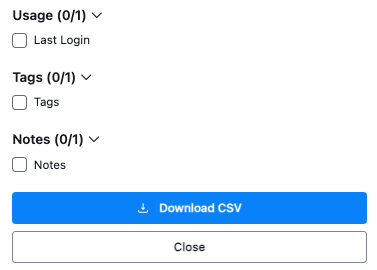
- Select the information you want to include in your report. When you click any of the options below, a list of details will expand that you can select from. When you’re done, click download CSV.